- 1. RBAC
- 2. kubeconfig
- 3. NetworkPolicy
1. RBAC
kubernetes 支持多种权限管理模式,如RBAC(Role-Based Access Control), ABAC(Attribute-Based Access Control)和Node Authorization,常用的还是RBAC,所以本文主要研究对象为RBAC。
1.1 RBAC 基本原理
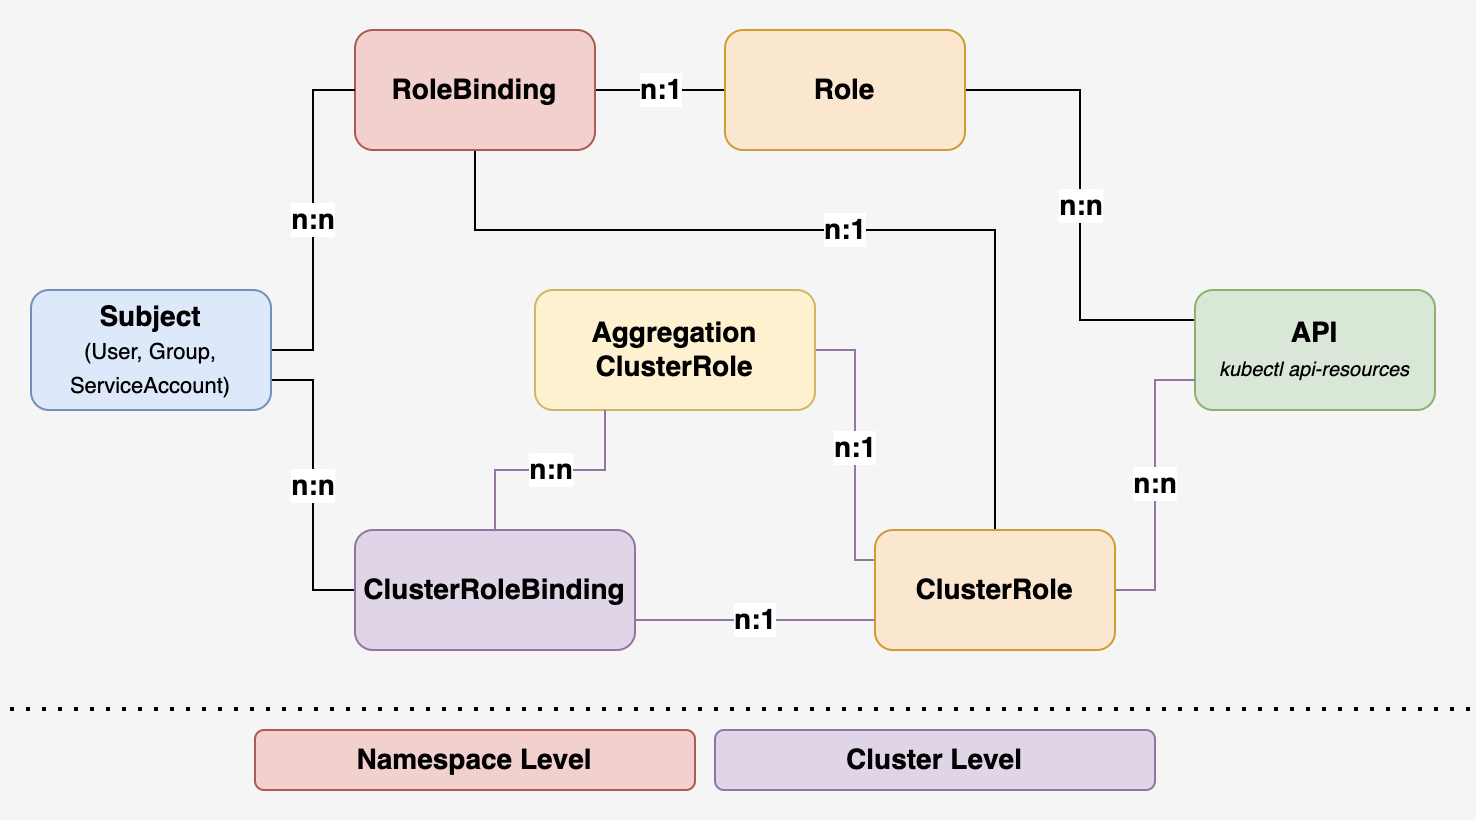
1.2 授权对象 Subject
- User: 针对个人
- Group: 针对某个组,User 可以属于某个组
- ServiceAccount: ServiceAccount也是一种账户,专门用来给应用程序使用的,主要用来做API服务器身份验证或者基于身份的安全策略管理。
1.3 Role, ClusterRole, RoleBinding, ClusterRoleBinding
rbac.authorization.k8s.io 下定义的四种顶级类型,用户可以像使用其他 Kubernetes API 资源一样 (例如通过 kubectl、API 调用等)与这些资源进行交互。
1.3.1 Role
apiVersion: rbac.authorization.k8s.io/v1
kind: Role
metadata:
  namespace: default
  name: pod-reader
rules:
- apiGroups: [""] # "" 标明 core API 组, 也可以用*代表所有的apiGroup
  resources: ["pods"]
  resourceNames: ["my-pod"] # 可以省略
  verbs: ["get", "watch", "list"]
1.3.2 ClusterRole
apiVersion: rbac.authorization.k8s.io/v1
kind: ClusterRole
metadata:
  # "namespace" 被忽略,因为 ClusterRoles 不受名字空间限制
  name: secret-reader
rules:
- apiGroups: [""]
  # 在 HTTP 层面,用来访问 Secret 资源的名称为 "secrets"
  resources: ["secrets"]
  verbs: ["get", "watch", "list"]
- apiGroups: ["example.com"]
  resources: ["*"]
  verbs: ["*"]
1.3.3 RoleBinding
apiVersion: rbac.authorization.k8s.io/v1
# 此角色绑定允许 "jane" 读取 "default" 名字空间中的 Pod
# 你需要在该命名空间中有一个名为 “pod-reader” 的 Role
kind: RoleBinding
metadata:
  name: read-pods
  namespace: default
subjects:
# 你可以指定不止一个“subject(主体)”
- kind: User
  name: jane # "name" 是区分大小写的
  apiGroup: rbac.authorization.k8s.io
- kind: Group
  name: manager      # 'name' 是区分大小写的
  apiGroup: rbac.authorization.k8s.io
roleRef:
  # "roleRef" 指定与某 Role 或 ClusterRole 的绑定关系
  kind: Role        # 此字段必须是 Role 或 ClusterRole
  name: pod-reader  # 此字段必须与你要绑定的 Role 或 ClusterRole 的名称匹配
  apiGroup: rbac.authorization.k8s.io
RoleBinding 也可以引用 ClusterRole,以将对应 ClusterRole 中定义的访问权限授予 RoleBinding 所在名字空间的资源。这种引用使得你可以跨整个集群定义一组通用的角色, 之后在多个名字空间中复用。
apiVersion: rbac.authorization.k8s.io/v1
# 此角色绑定使得用户 "dave" 能够读取 "development" 名字空间中的 Secrets
# 你需要一个名为 "secret-reader" 的 ClusterRole
kind: RoleBinding
metadata:
  name: read-secrets
  # RoleBinding 的名字空间决定了访问权限的授予范围。
  # 这里隐含授权仅在 "development" 名字空间内的访问权限。
  namespace: development
subjects:
- kind: User
  name: dave # 'name' 是区分大小写的
  apiGroup: rbac.authorization.k8s.io
roleRef:
  kind: ClusterRole
  name: secret-reader
  apiGroup: rbac.authorization.k8s.io
1.3.4 ClusterRoleBinding
apiVersion: rbac.authorization.k8s.io/v1
# 此角色绑定使得用户 "dave" 能够读取 "development" 名字空间中的 Secrets
# 你需要一个名为 "secret-reader" 的 ClusterRole
kind: RoleBinding
metadata:
  name: read-secrets
  # RoleBinding 的名字空间决定了访问权限的授予范围。
  # 这里隐含授权仅在 "development" 名字空间内的访问权限。
  namespace: development
subjects:
- kind: User
  name: dave # 'name' 是区分大小写的
  apiGroup: rbac.authorization.k8s.io
roleRef:
  kind: ClusterRole
  name: secret-reader
  apiGroup: rbac.authorization.k8s.io
1.3.5 聚合ClusterRole(AggregationClusterRole)
---
apiVersion: rbac.authorization.k8s.io/v1
kind: ClusterRole
metadata:
  name: monitoring
aggregationRule:
  clusterRoleSelectors:
  - matchLabels:
      rbac.example.com/aggregate-to-monitoring: "true"
rules: [] # 控制面自动填充这里的规则

---
kind: ClusterRole
metadata:
  name: monitoring-endpoints
  labels:
    rbac.example.com/aggregate-to-monitoring: "true"
# 当你创建 "monitoring-endpoints" ClusterRole 时,
# 下面的规则会被添加到 "monitoring" ClusterRole 中
rules:
- apiGroups: [""]
  resources: ["services", "endpointslices", "pods"]
  verbs: ["get", "list", "watch"]
1.3.6 Verbs
| HTTP 动词 | 请求动词 |
|---|---|
| POST | create |
| GET, HEAD | get (针对单个资源)、list(针对集合) |
| PUT | update |
| PATCH | patch |
| DELETE | delete(针对单个资源)、deletecollection(针对集合) |
1.3.7 Cluster Default Role
在修改名称包含
system:前缀的 ClusterRole 和 ClusterRoleBinding 时要格外小心。 对这些资源的更改可能导致集群无法正常运作。
具体内容参考 https://kubernetes.io/zh-cn/docs/reference/access-authn-authz/rbac/#default-roles-and-role-bindings
1.4 API Resources
$ kubectl api-resources
NAME                              SHORTNAMES   APIVERSION                             NAMESPACED   KIND
bindings                                       v1                                     true         Binding
componentstatuses                 cs           v1                                     false        ComponentStatus
configmaps                        cm           v1                                     true         ConfigMap
endpoints                         ep           v1                                     true         Endpoints
events                            ev           v1                                     true         Event
limitranges                       limits       v1                                     true         LimitRange
namespaces                        ns           v1                                     false        Namespace
nodes                             no           v1                                     false        Node
persistentvolumeclaims            pvc          v1                                     true         PersistentVolumeClaim
persistentvolumes                 pv           v1                                     false        PersistentVolume
pods                              po           v1                                     true         Pod
......
......
1.5 授权对象 Subject详解
1.5.1 User & Group
# 安装openssl 1.1.1 https://gist.github.com/Bill-tran/5e2ab062a9028bf693c934146249e68c
$ yum -y update
$ yum install -y make gcc perl-core pcre-devel wget zlib-devel
$ wget https://ftp.openssl.org/source/openssl-1.1.1k.tar.gz
$ tar -xzvf openssl-1.1.1k.tar.gz
$ cd openssl-1.1.1k
$ ./config --prefix=/usr --openssldir=/etc/ssl --libdir=lib no-shared zlib-dynamic
$ make
$ make test
$ make install
$ cat > /etc/profile.d/openssl.sh << EOF
export LD_LIBRARY_PATH=/usr/local/lib:/usr/local/lib64
EOF
$ source /etc/profile.d/openssl.sh
$ openssl version
# 基于ed25519算法生成key文件
$ openssl genpkey -out freud.key -algorithm ed25519
# 生成csr文件,并写入user为freud, group为edit
$ openssl req -new -key freud.key -out freud.csr -subj '/CN=freud/O=edit'
# base64 csr文件内容
$ cat freud.csr |base64 | tr -d "\n"
LS0tLS1CRUdJTiBDRVJUSUZJQ0FURSBSRVFVRVNULS0tLS0KTUlHZU1GSUNBUUF3SHpFT01Bd0dBMVVFQXd3RlpuSmxkV1F4RFRBTEJnTlZCQW9NQkdWa2FYUXdLakFGQmdNcgpaWEFESVFBWDlFcDN0UHVpQndqSG01TGlobm5SM29pWVlUK0loekRaV0dzbGlaaE9PNkFBTUFVR0F5dGxjQU5CCkFNWkcxQ0xucVNVWktwM3pGNzNiWW1QaG5sMjlFMExjbmJRcnIxenM2UFVrQkgvTjl6OStJZ0ljL0VVOTNKZ2gKRFBPSkJscThSR1dlYWNMcURLT0s4QXc9Ci0tLS0tRU5EIENFUlRJRklDQVRFIFJFUVVFU1QtLS0tLQo=
# 生成一个certificates的request
$ cat <<EOF | kubectl apply -f -
apiVersion: certificates.k8s.io/v1
kind: CertificateSigningRequest
metadata:
  name: freud
spec:
  request: LS0tLS1CRUdJTiBDRVJUSUZJQ0FURSBSRVFVRVNULS0tLS0KTUlHZU1GSUNBUUF3SHpFT01Bd0dBMVVFQXd3RlpuSmxkV1F4RFRBTEJnTlZCQW9NQkdWa2FYUXdLakFGQmdNcgpaWEFESVFBWDlFcDN0UHVpQndqSG01TGlobm5SM29pWVlUK0loekRaV0dzbGlaaE9PNkFBTUFVR0F5dGxjQU5CCkFNWkcxQ0xucVNVWktwM3pGNzNiWW1QaG5sMjlFMExjbmJRcnIxenM2UFVrQkgvTjl6OStJZ0ljL0VVOTNKZ2gKRFBPSkJscThSR1dlYWNMcURLT0s4QXc9Ci0tLS0tRU5EIENFUlRJRklDQVRFIFJFUVVFU1QtLS0tLQo=
  signerName: kubernetes.io/kube-apiserver-client
  expirationSeconds: 86400
  usages:
  - client auth
EOF
# approve 这个request
$ kubectl certificate approve freud

# 查看approve之后的CSR信息
$ kubectl get csr freud -o yaml

# 导出生成的crt文件
$ kubectl get csr/freud -o jsonpath='{.status.certificate}' |base64 -d > freud.crt
$ cat freud.crt
-----BEGIN CERTIFICATE-----
MIICCTCB8qADAgECAhBCpabpWc4F6iorKCahv2oLMA0GCSqGSIb3DQEBCwUAMBUx
EzARBgNVBAMTCmt1YmVybmV0ZXMwHhcNMjMwNTA1MDcyOTQ4WhcNMjMwNTA2MDcy
OTQ4WjAfMQ0wCwYDVQQKEwRlZGl0MQ4wDAYDVQQDEwVmcmV1ZDAqMAUGAytlcAMh
ABf0Sne0+6IHCMebkuKGedHeiJhhP4iHMNlYayWJmE47o0YwRDATBgNVHSUEDDAK
BggrBgEFBQcDAjAMBgNVHRMBAf8EAjAAMB8GA1UdIwQYMBaAFOpHK5MKrq4zHQlr
7uj6fI4wVBcDMA0GCSqGSIb3DQEBCwUAA4IBAQB0v51tkoekTDEbvuDJOCDON1Kt
LINCWaY93FtoW/TTqTp3nFrB+Wai451WFPUpxm4eDucM5srrztndUvCwjPL8QhjL
mXjRMfQXBA1GLjrF9wQlm/GNf3CzmK9Ao7KbAbagYOK95dl0E4asF1y2KIap0Lez
yqp264mA2ByZLQZWnVXwLP2UtDKDjWblibhpkgo9REo/M0Dbe7p4P/ZX15mr1aVH
sDeN1/p6YHmVX1Te3c2scX7EJd4GI1r++j7KiaCgyLYNiKLQLfTnm64oCf1hr5lH
uwfBKVwlY88rk9jLo2xJh+4iE1UL2bv/MTWlSzF8vwslE9hameqjtMDD1Lz2
-----END CERTIFICATE-----

# 生成集群登录config文件
$ kubectl --kubeconfig freud-kubeconfig config set-credentials freud --client-key=freud.key --client-certificate=freud.crt --embed-certs=true
$ kubectl --kubeconfig freud-kubeconfig config set-context freud --cluster=k8s --user=freud
$ kubectl --kubeconfig freud-kubeconfig config set-cluster k8s --insecure-skip-tls-verify=true --server=https://172.16.140.250:16443
$ kubectl --kubeconfig freud-kubeconfig config use-context freud
$ mv freud-kubeconfig ~/.kube/config

# 并未给freud 用户设置任何权限
$ kubectl get node
Error from server (Forbidden): nodes is forbidden: User "freud" cannot list resource "nodes" in API group "" at the cluster scope

# 使用admin账户添加clusterrole权限
$ cat > freud-adminuser.yaml << EOF
---
apiVersion: rbac.authorization.k8s.io/v1
kind: ClusterRoleBinding
metadata:
  name: freud-user
roleRef:
  apiGroup: rbac.authorization.k8s.io
  kind: ClusterRole
  name: cluster-admin
subjects:
- kind: User
  name: freud
  apiGroup: rbac.authorization.k8s.io
EOF
$ kubectl apply -f freud-adminuser.yaml

# 切换回freud账户,进行权限校验
$ kubectl get node
NAME          STATUS   ROLES                  AGE    VERSION
k8s-master1   Ready    control-plane,master   113m   v1.23.8
k8s-master2   Ready    control-plane,master   112m   v1.23.8
k8s-node1     Ready    worker                 111m   v1.23.8
1.5.2 为pod指定ServiceAccount
- ServiceAccount是在namespace下的对象,每个namespace在创建的时候回自动创建一个default的ServiceAccount,pod在启动的时候会自动挂载当前default namespace下的ServiceAccount.
- 也可以通过在pod声明中指定自定义的ServiceAccount,来达到其他的授权。
- 可以讲imgaepull secret关联serviceaccount,然后讲serviceaccount挂在到pod上实现隐藏credential的作用
https://kubernetes.io/zh-cn/docs/tasks/configure-pod-container/configure-service-account/
1.5.3 使用serviceaccount登录kubernetes dashboard
$ cat > dashboard-adminuser.yaml << EOF
apiVersion: v1
kind: ServiceAccount
metadata:
name: admin-user
namespace: kubernetes-dashboard
---
apiVersion: rbac.authorization.k8s.io/v1
kind: ClusterRoleBinding
metadata:
name: admin-user
roleRef:
apiGroup: rbac.authorization.k8s.io
kind: ClusterRole
name: cluster-admin
subjects:
- kind: ServiceAccount
name: admin-user
namespace: kubernetes-dashboard
EOF
# 创建admin账号
$ kubectl apply -f dashboard-adminuser.yaml
serviceaccount/admin-user created
clusterrolebinding.rbac.authorization.k8s.io/admin-user created
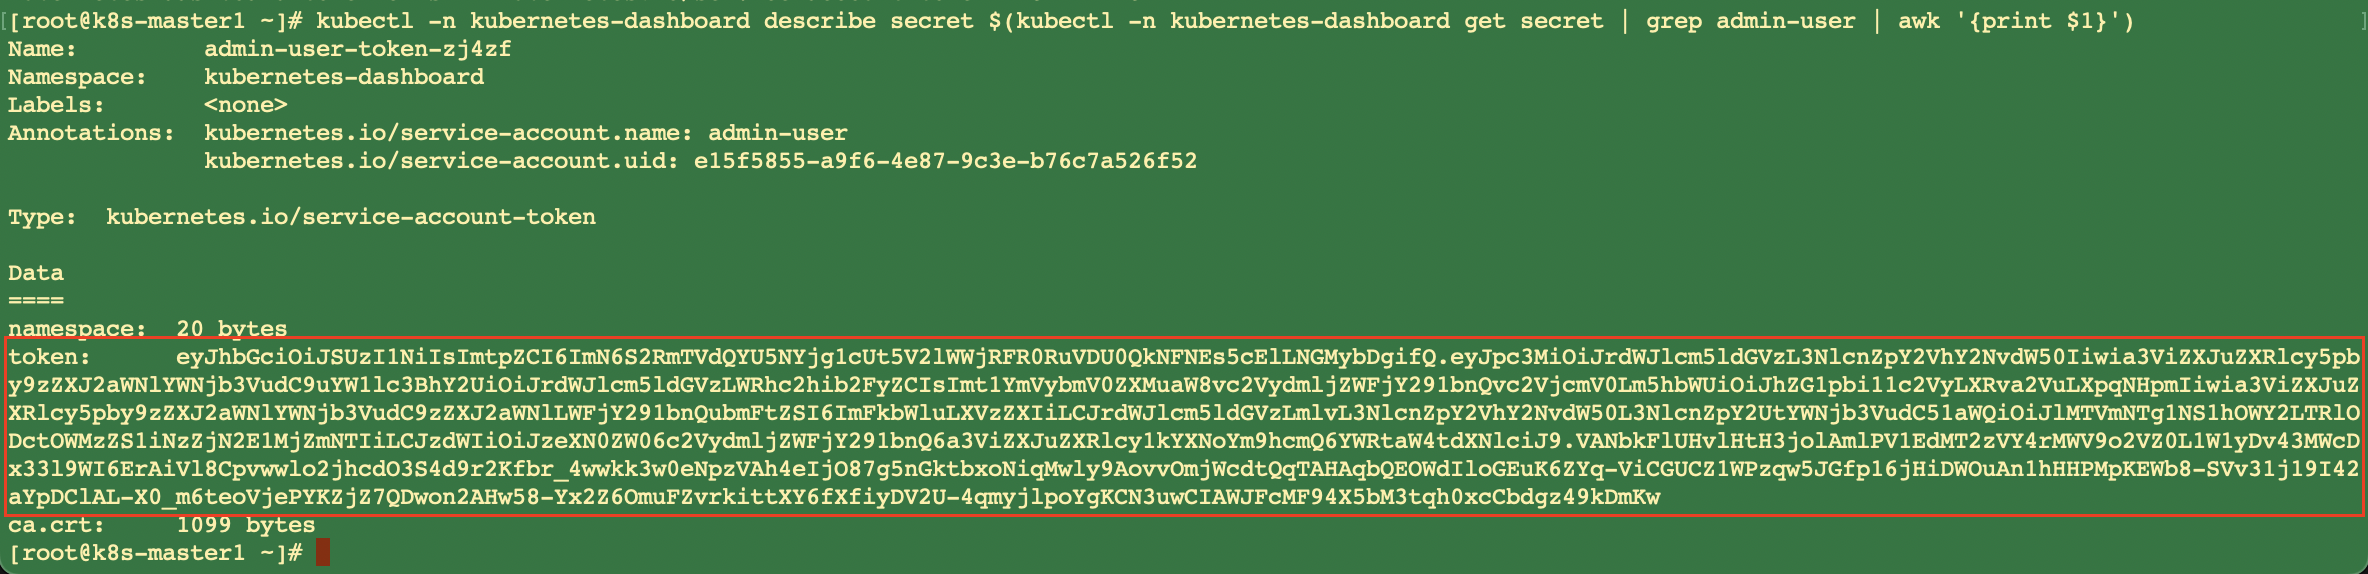
# 查看admin账号的token
$ kubectl -n kubernetes-dashboard describe secret $(kubectl -n kubernetes-dashboard get secret | grep admin-user | awk '{print $1}')
1.6 判断是否有权限
# 当前用户是否可以执行的此操作
$ kubectl auth can-i create deployments --namespace dev

# dave用户是否可以执行的此操作
$ kubectl auth can-i list secrets --namespace dev --as dave

# 检查名字空间 dev 里的 dev-sa 服务账户是否可以列举名字空间 target 里的 Pod
$ kubectl auth can-i list pods \
	--namespace target \
	--as system:serviceaccount:dev:dev-sa
2. kubeconfig
2.1 集群master生成的默认kube config文件
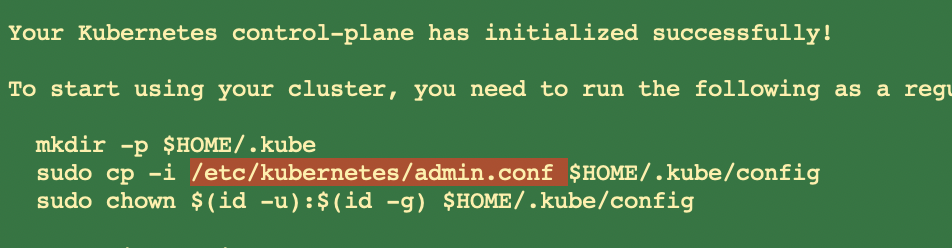 可以拷贝到任意服务器的
~/.kube文件夹中,通过远程连接操作kubernetes集群。
2.2 生成针对User或Group的基于certificate校验的config文件
参考上文#1.5.1
2.3 Token方式
# 生成Token
$ kubectl create serviceaccount remote-client-admin -n kube-system
# remote-client-admin 绑定为集群账户
$ kubectl create clusterrolebinding remote-client-admin --clusterrole=cluster-admin --serviceaccount=kube-system:remote-client-admin
# 显示出名字为remote-client-admin-*的第一个匹配账户的详细信息
$ kubectl describe secrets -n kube-system $(kubectl -n kube-system get secret | awk '/remote-client-admin/{print $1}')

# 配置Token登录
$ kubectl config set-credentials tf-admin --token={上条命令的Token}
# 配置连接地址 --server={集群的连接地址https://xx.xx.xx.xx:xx}
$ kubectl config set-cluster tf-cluster --insecure-skip-tls-verify=true --server=https://172.16.140.250:16443
$ kubectl config set-context tf-system --cluster=tf-cluster --user=tf-admin
$ kubectl config use-context tf-system
3. NetworkPolicy
集群创建之后默认情况下,所有的pod之间的网络都是互通的。需要通过NetworkPolicy进行网络隔离,当然也可以使用一些其他的插件如Calico等进行隔离。
Pod与Pod之间的通信是通过如下三个标识符的组合来辩识的:
- 其他被允许的 Pods(例外:Pod 无法阻塞对自身的访问)
- 被允许的名字空间
- IP 组块 - CIDR(例外:与 Pod 运行所在的Node的通信总是被允许的,无论 Pod 或Node的 IP 地址)
apiVersion: networking.k8s.io/v1
kind: NetworkPolicy
metadata:
  name: test-network-policy
  namespace: default
spec:
  podSelector:
    matchLabels:
      role: db
  policyTypes:
    - Ingress
    - Egress
  ingress:
    - from:
        # -之后的内容是或的关系
        - ipBlock:
            cidr: 172.17.0.0/16
            except:
              - 172.17.1.0/24
        - namespaceSelector:
            matchLabels:
              project: myproject
        - podSelector:
            matchLabels:
              role: frontend
      ports:
        - protocol: TCP
          port: 6379
  egress:
    - to:
        - ipBlock:
            cidr: 10.0.0.0/24
      ports:
        - protocol: TCP
          port: 5978
https://kubernetes.io/zh-cn/docs/concepts/services-networking/network-policies/