1. 创建WEB项目
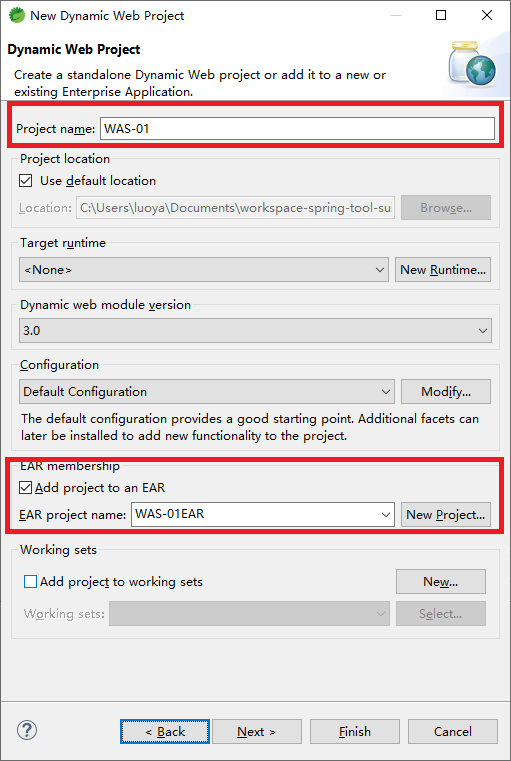
1.1 创建一个Dynamic Web Project
设置Project Name,并且选中Add Project to an EAR
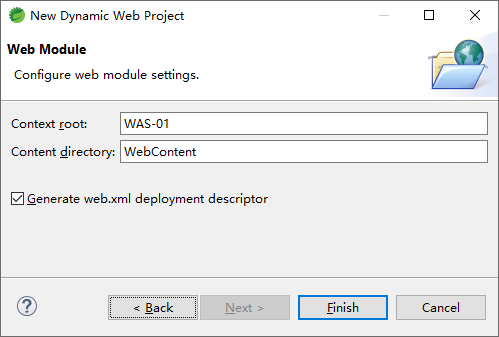
1.2 指定对应的Context Root和Context Directory
指定Context root和Content directory,并选中Generate web.xml deployment descriptor
1.3 WEB项目中的代码-Web.xml
<?xml version="1.0" encoding="UTF-8"?>
<web-app xmlns:xsi="http://www.w3.org/2001/XMLSchema-instance"
	xmlns="http://java.sun.com/xml/ns/javaee"
	xsi:schemaLocation="http://java.sun.com/xml/ns/javaee http://java.sun.com/xml/ns/javaee/web-app_3_0.xsd"
	id="WebApp_ID" version="3.0">
	<display-name>WAS-01</display-name>

	<welcome-file-list>
		<welcome-file>index.jsp</welcome-file>
	</welcome-file-list>

	<servlet>
		<servlet-name>TestServlet1</servlet-name>
		<servlet-class>com.freud.TestServlet1</servlet-class>
	</servlet>
	<servlet-mapping>
		<servlet-name>TestServlet1</servlet-name>
		<url-pattern>/test</url-pattern>
	</servlet-mapping>
</web-app>
1.4 WEB项目中的代码 - index.jsp
<%@ page language="java" contentType="text/html; charset=UTF-8"
	pageEncoding="UTF-8"%>
<!DOCTYPE html>
<html>
<head>
<title>HelloWorld</title>
</head>
<body>
HelloWorld index! This is my first WAS application!
</body>
</html>

### 1.5 WEB项目中的代码 - TestServlet1.java
package com.freud.test;

import java.io.IOException;
import javax.servlet.ServletException;
import javax.servlet.http.HttpServlet;
import javax.servlet.http.HttpServletRequest;
import javax.servlet.http.HttpServletResponse;

public class TestServlet1 extends HttpServlet {

	@Override
	protected void service(HttpServletRequest req, HttpServletResponse resp) throws ServletException, IOException {
		resp.getWriter().write("Hello Test");
	}

}
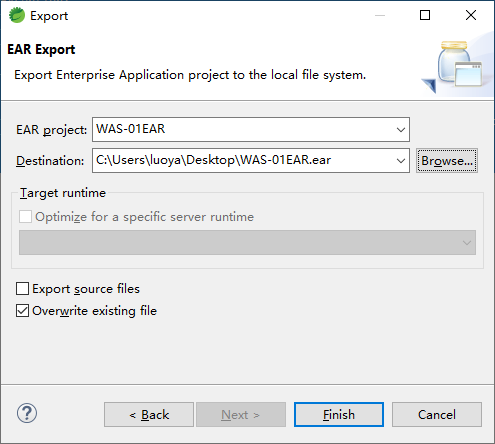
2. 生成ear文件
在WAS-01EAR项目上右键Export -> EAR file -> 导出
3. 部署应用
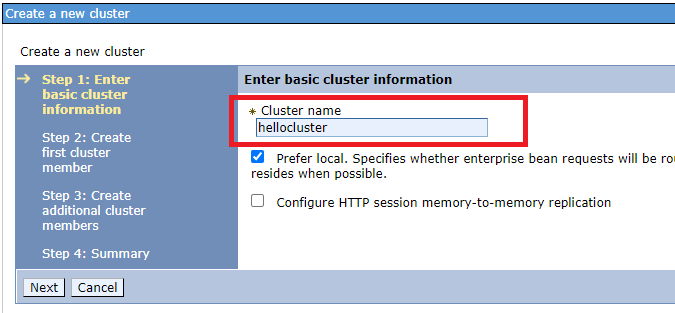
3.1 创建一个新的cluster
打开WAS Console,依次点击Servers -> Clusters -> WebSphere application server clusters -> New, 设置Cluster Name为 hellocluster
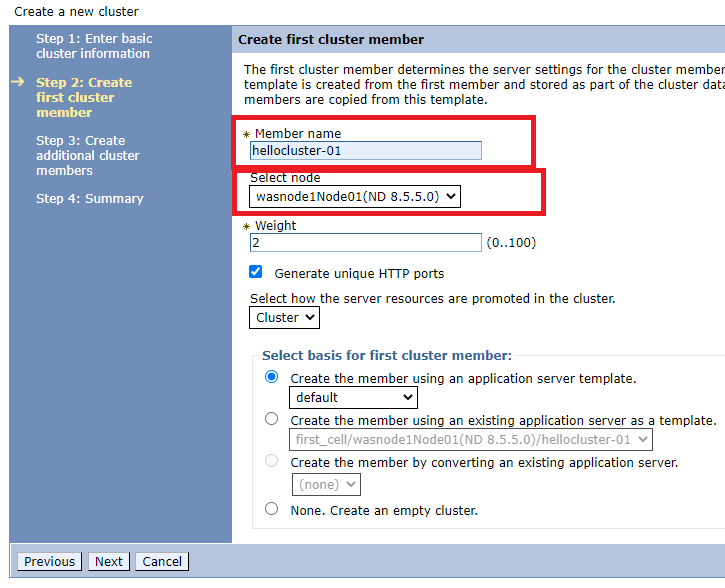
设置cluster的第一个Node,填写信息如下,
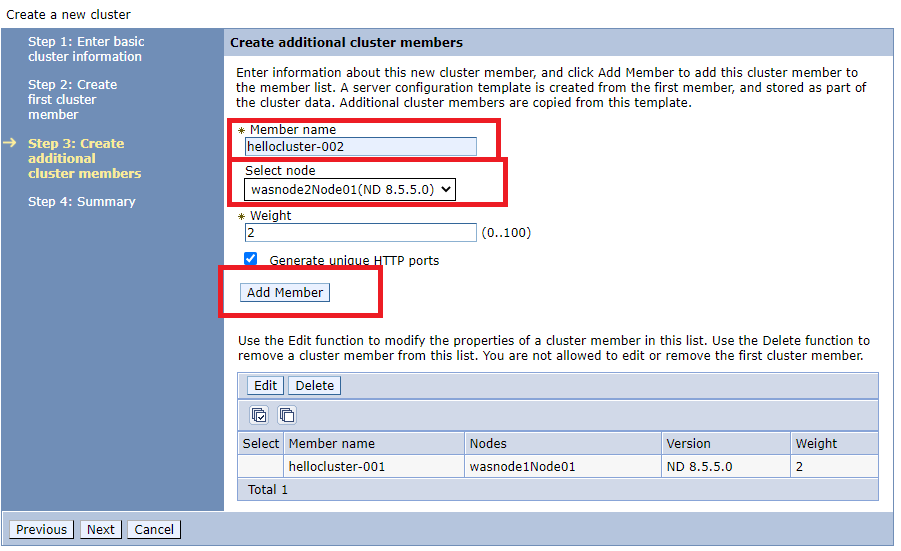
向cluster中添加其他Node,填写相关信息,然后点击Add Member
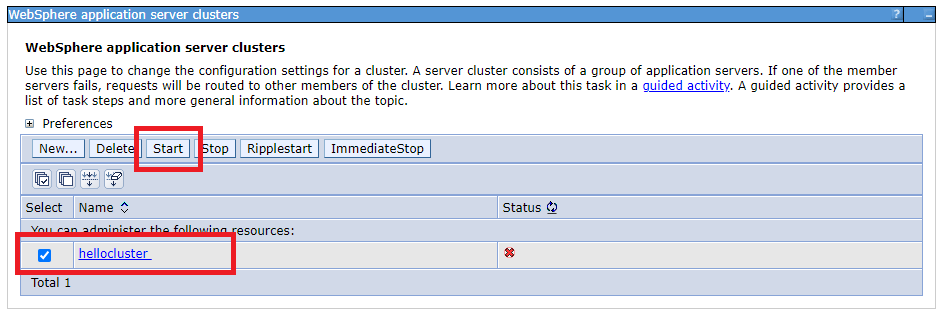
选中创建的cluster并start
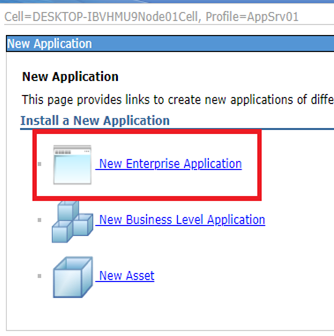
3.2 创建一个新的Enterprise Application
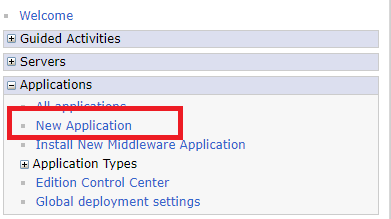
依次点击Applications -> New Application
选择New Enterprise Application
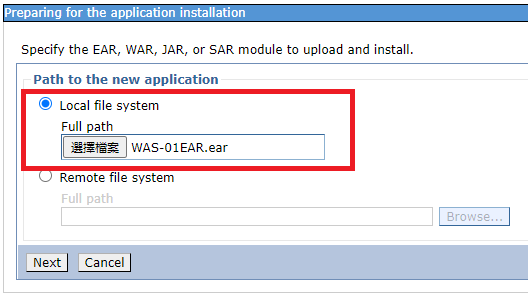
选择刚刚导出的EAR文件
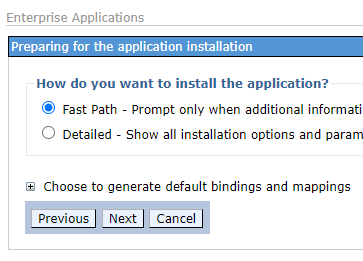
在Prepare for the application installation中,选择Fast Path
在Select Installation Options中直接Next

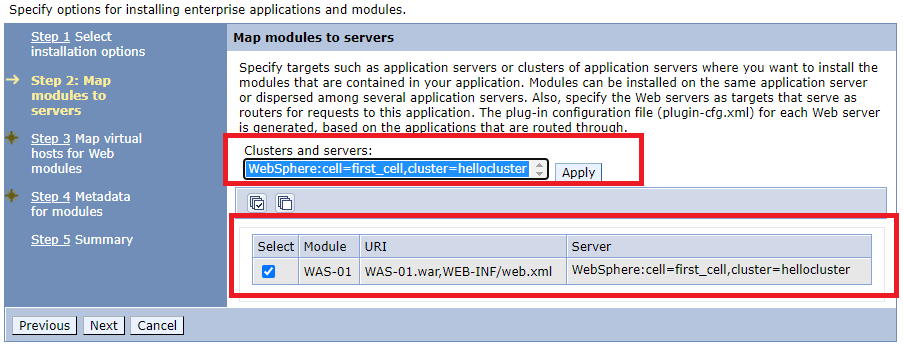
在Map modules to servers中,选中对应的cluster和servers,并选中对应的Modules
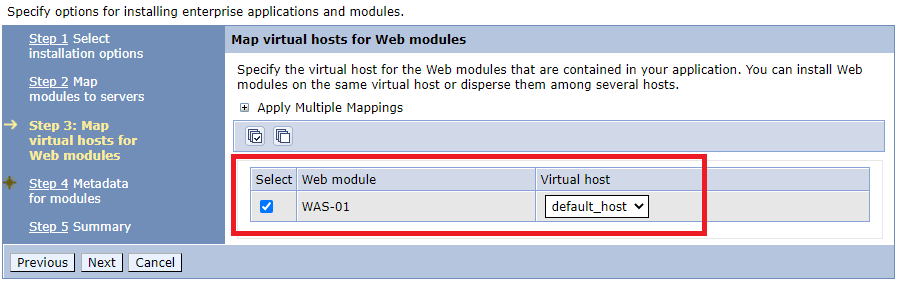
选中对应的virtual host
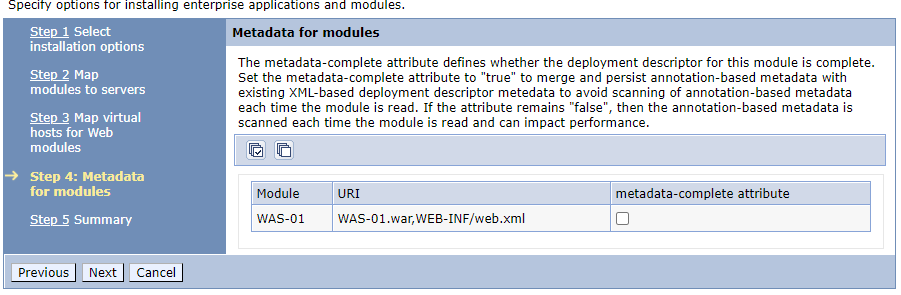
在Metadata for modules中直接Next
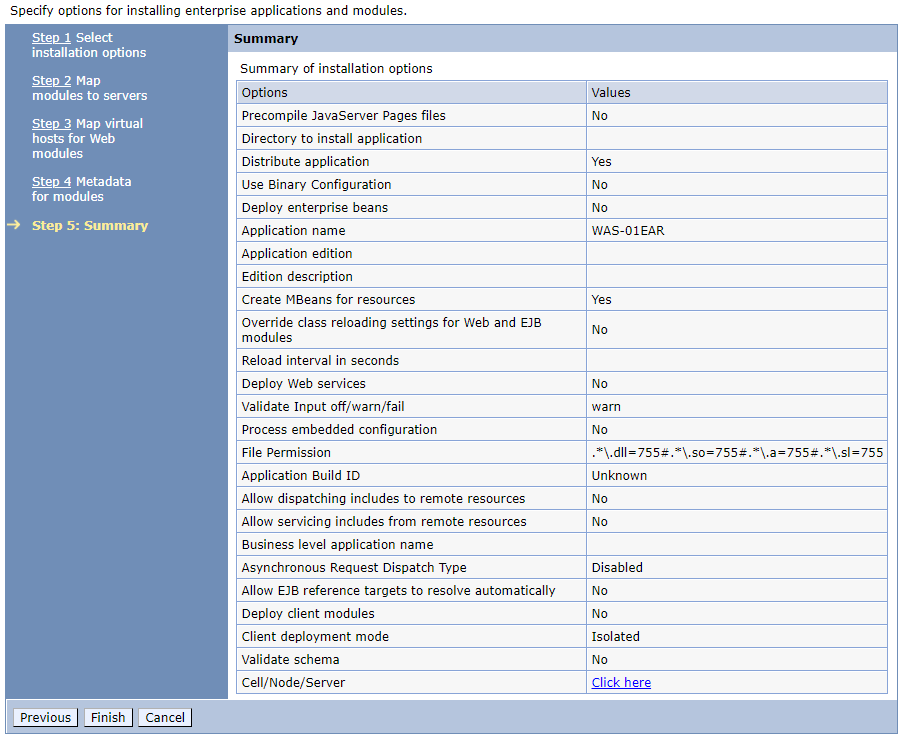
安装预览
4. 启动应用并验证
4.1 启动应用
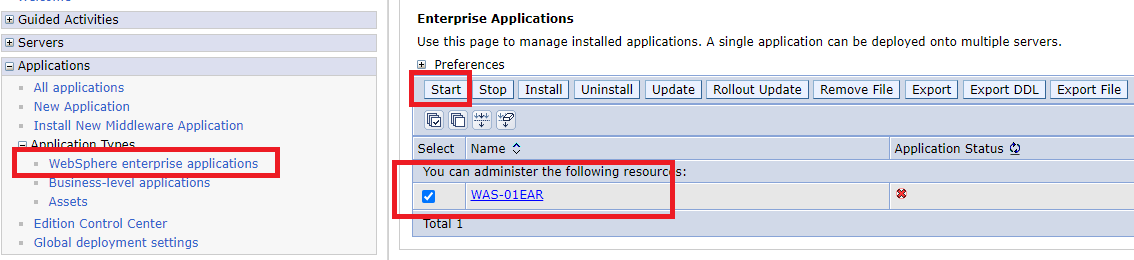
在WEB Console依次点击 Applications -> Application Types -> Websphere enterprise applications, 选中WAS-01EAR,点击start
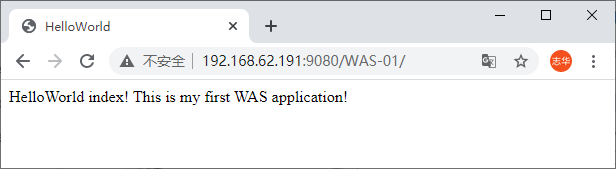
4.2 验证
http://192.168.62.191:9080/WAS-01/
5. 启动应用常遇到的问题汇总
JDK版本错误
当访问 http://192.168.62.191:9080/WAS-01/test 的时候遇到如下错误
Error 404: javax.servlet.UnavailableException: SRVE0200E: Servlet [com.freud.TestServlet1]: Could not find required class - class java.lang.ClassNotFoundException: com.freud.TestServlet1
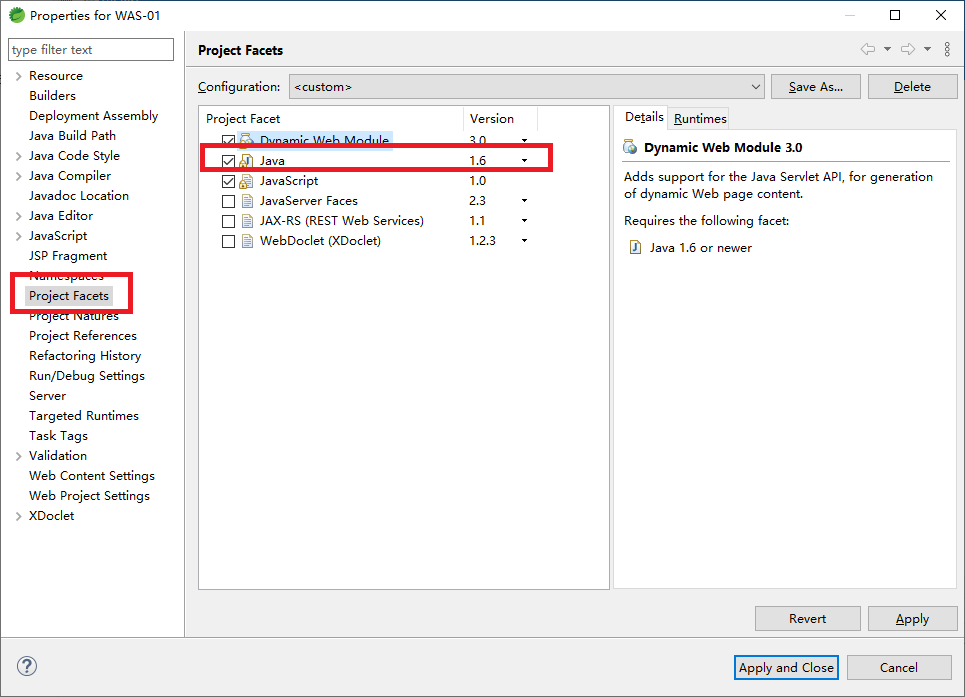
原因是WAS所依赖的JDK是1.6.0,而Eclipse的编译环境是高于1.6的,需要降低Eclipse的编译版本。
6. 日志查看方法
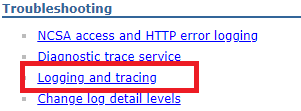
6.1 Servers -> Websphere application Server -> Troubleshooting -> Logging and tracing
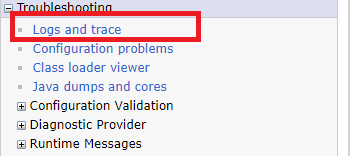
6.2 Troubleshooting -> logs and trace
6.3 直接打开文件夹
| 191 | /opt/IBM/WebSphere/AppServer/profiles/node1/logs/hellocluster-01 |
| 192 | /opt/IBM/WebSphere/AppServer/profiles/node2/logs/hellocluster-02 |