- 准备阶段
- 1. 准备两台centos虚拟机
- 1.1 下载虚拟机镜像
- 1.2 打开VMware Workstation, 并创建两个虚拟机
- 1.3 点击“文件”-“新建虚拟机”
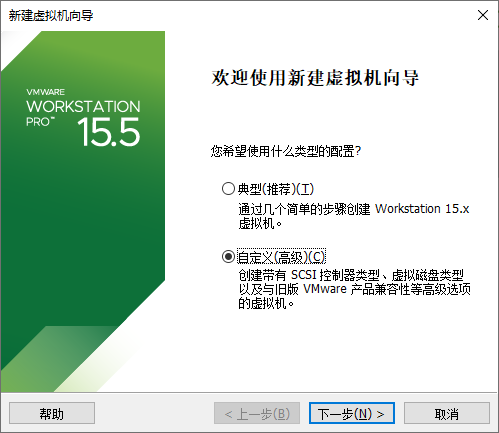
- 1.4 选择“自定义”
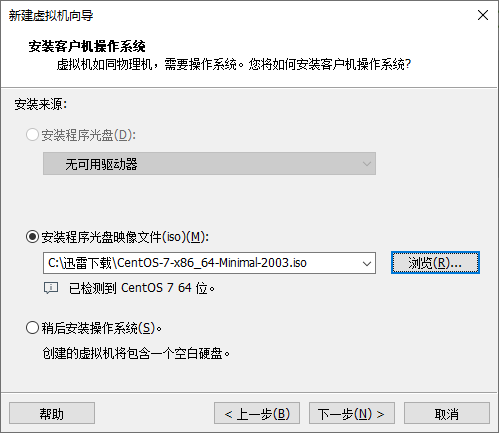
- 1.5 选择安装程序光盘映像文件,并指定为下载的IOS文件
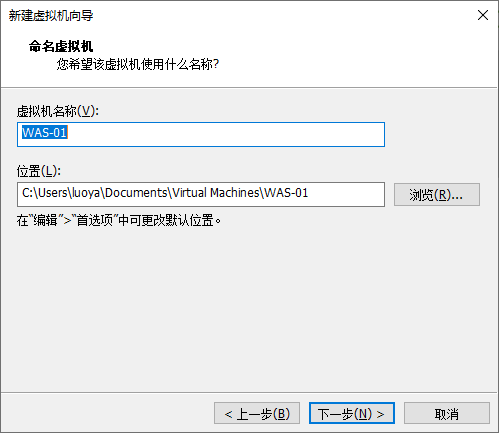
- 1.6 设置虚拟机名和路径
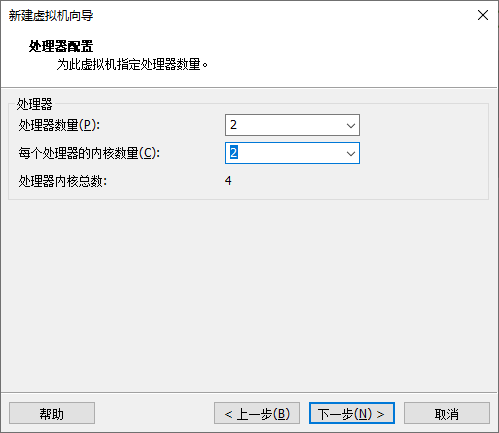
- 1.7 设置虚拟机处理器和内核分别为2
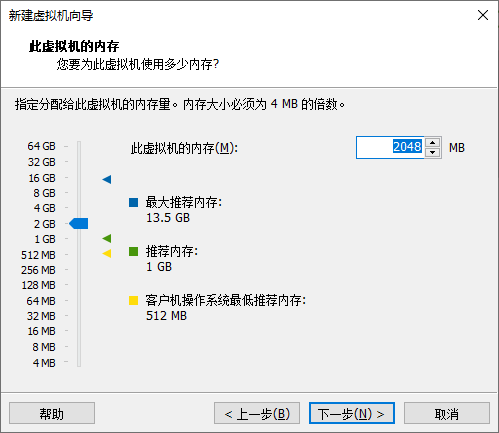
- 1.8 设置虚拟机内存为2048G
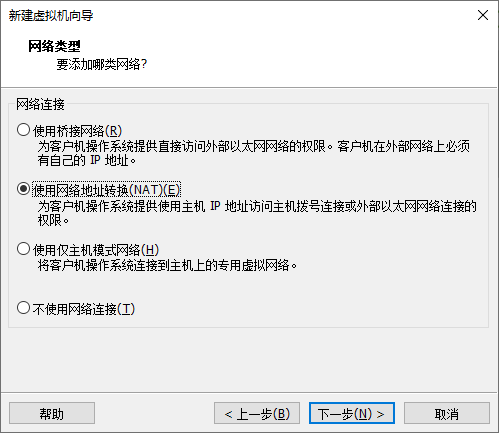
- 1.9 设置网络类型
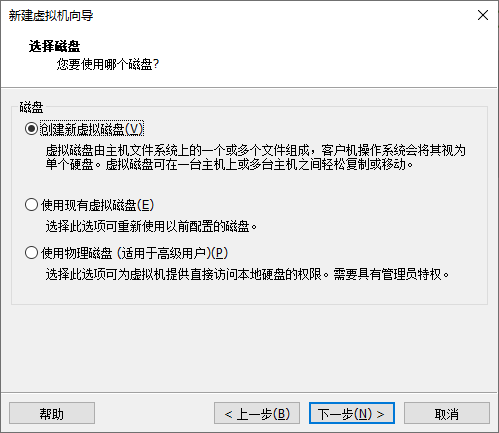
- 1.10 选择磁盘
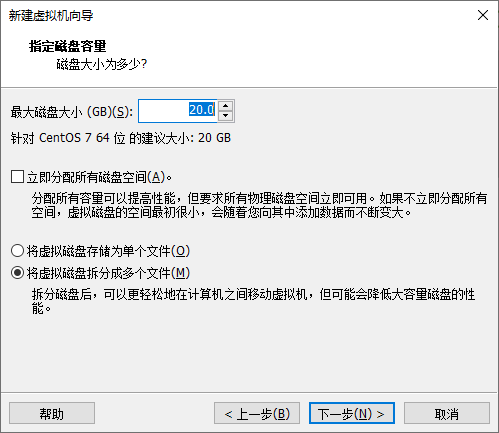
- 1.11 设置磁盘大小为20G,并将虚拟磁盘拆分为多个文件
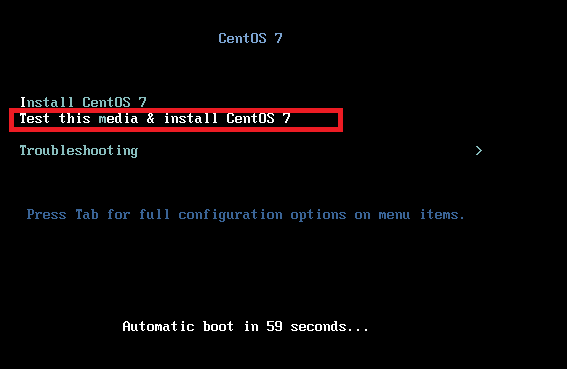
- 1.12 完成创建,并安装操作系统。选择 “Test this media & install CentOS 7”
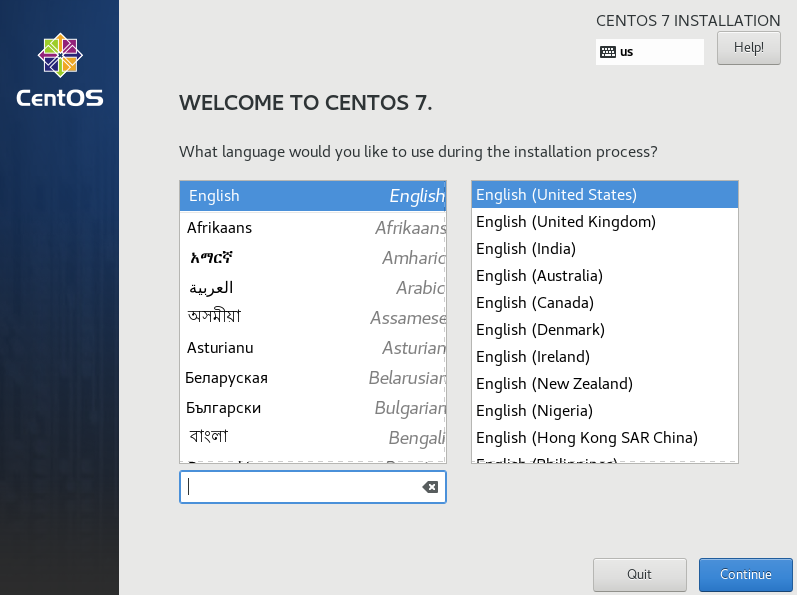
- 1.13 选择语言为:English
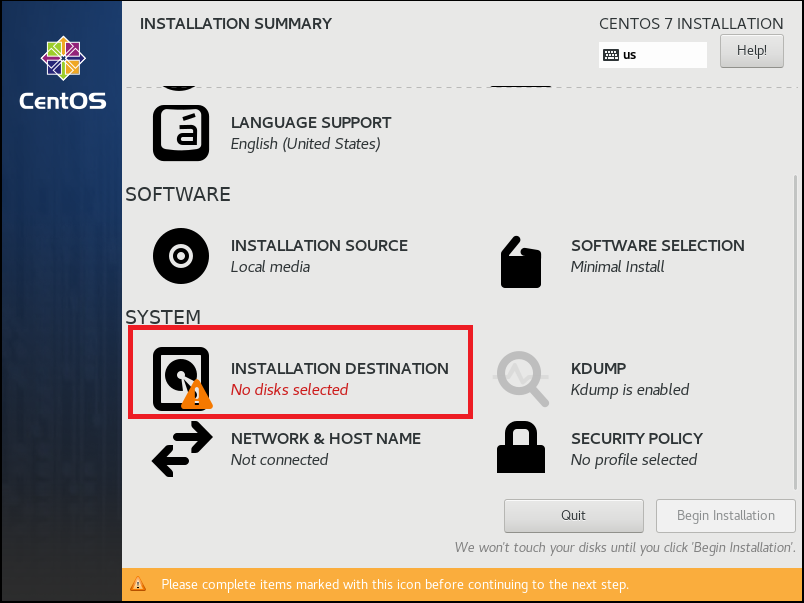
- 1.14 设置安装路径
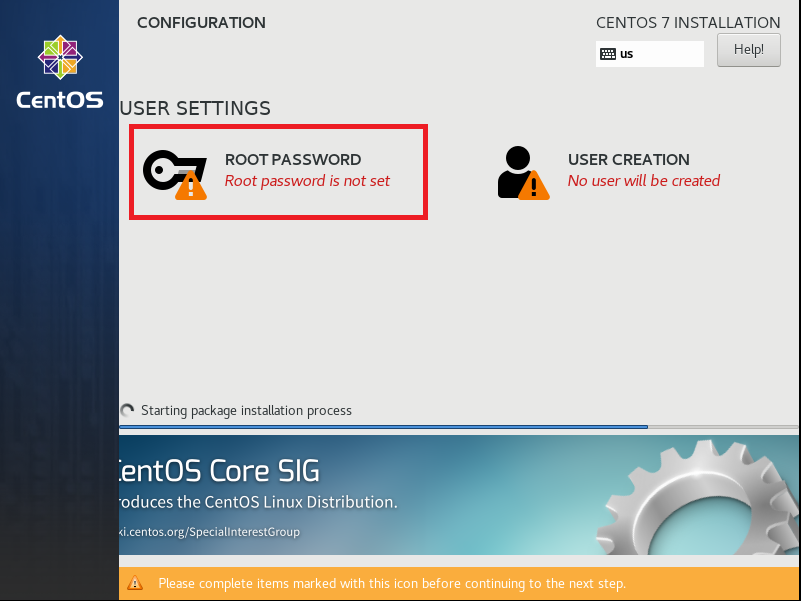
- 1.15 设置ROOT用户密码,本次设置为
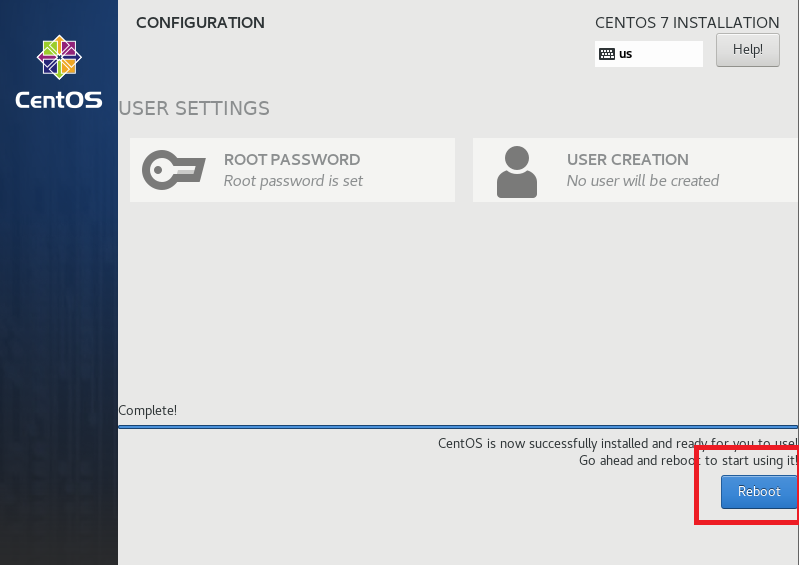
was123456 - 1.16 重启虚拟机
- 1.17 按照上述相同步骤,创建另一个虚拟机WAS-02
- 2. 为两台虚拟机设置为固定IP模式
- 3. 安装Installation Manager
- 4. 安装Websphere application Server
准备阶段
以下是本次会用到的所有的软件
1. 准备两台centos虚拟机
1.1 下载虚拟机镜像
| centos 官方下载地址 | https://www.centos.org/download/ |
| 本实验所用centos镜像 | http://mirrors.aliyun.com/centos/7.8.2003/isos/x86_64/CentOS-7-x86_64-Minimal-2003.iso |
1.2 打开VMware Workstation, 并创建两个虚拟机
1.3 点击“文件”-“新建虚拟机”

1.4 选择“自定义”
1.5 选择安装程序光盘映像文件,并指定为下载的IOS文件
1.6 设置虚拟机名和路径
1.7 设置虚拟机处理器和内核分别为2
1.8 设置虚拟机内存为2048G
1.9 设置网络类型
1.10 选择磁盘
1.11 设置磁盘大小为20G,并将虚拟磁盘拆分为多个文件
1.12 完成创建,并安装操作系统。选择 “Test this media & install CentOS 7”
1.13 选择语言为:English
1.14 设置安装路径
1.15 设置ROOT用户密码,本次设置为 was123456
1.16 重启虚拟机
1.17 按照上述相同步骤,创建另一个虚拟机WAS-02
2. 为两台虚拟机设置为固定IP模式
2.1 设置VMware为NAT模式,依次点击”编辑“-》”虚拟网络编辑器”,并点击下面红色标记处的”更改设置“
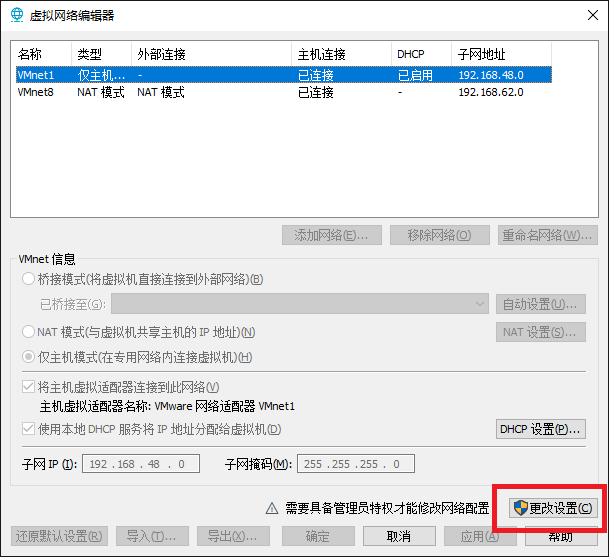
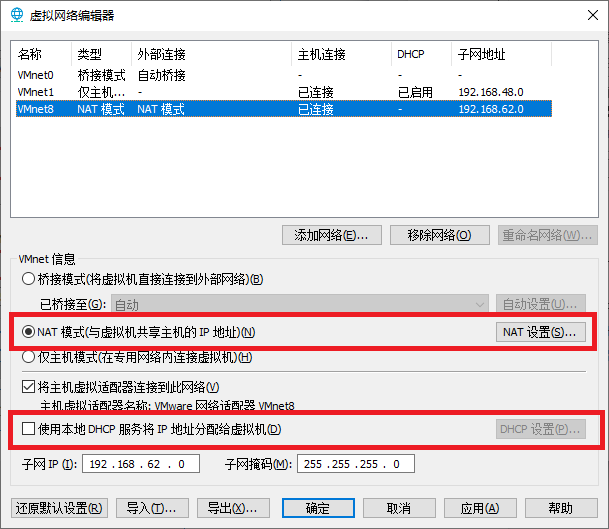
2.2 在弹出的窗口中选择VMnet8 并确定设置如下
其中第一关闭了DHCP,这个是动态分配IP地址给虚拟机使用的,每次虚拟机重启都会修改IP,比较烦人,不建议开启。第二选中了NAT模式
2.3 点击NAT设置,在弹出的窗口中做如下设置
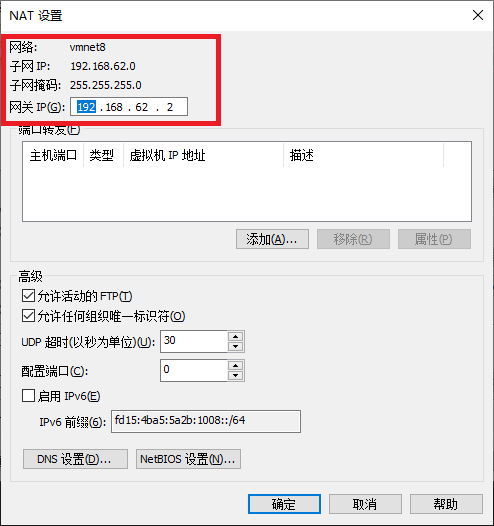
2.4 在两台虚拟机内部分别修改配置
修改 /etc/sysconfig/network-scripts/ifcfg-ens33文件
设置BOOTPROTO, IPADDR, NETMASK, GATEWAY和ONBOOT
TYPE=Ethernet
PROXY_METHOD=none
BROWSER_ONLY=no
BOOTPROTO=static
IPADDR=192.168.62.191
NETMASK=255.255.255.0
GATEWAY=192.168.62.2
DEFROUTE=yes
IPV4_FAILURE_FATAL=no
IPV6INIT=yes
IPV6_AUTOCONF=yes
IPV6_DEFROUTE=yes
IPV6_FAILURE_FATAL=no
IPV6_ADDR_GEN_MODE=stable-privacy
NAME=ens33
UUID=10ee381c-40e2-4aed-ac3b-d327cc58605e
DEVICE=ens33
ONBOOT=yes
修改/etc/sysconfig/network文件
# Created by anaconda
NETWORKING=yes
HOSTNAME=WAS-01
GATEWAY=192.168.62.2
修改/etc/resolv.conf文件
search localdomain
nameserver 192.168.62.2
重启两个虚拟机,两个虚拟机已经按照如下静态IP设置完成。
| WAS-01 | 192.168.62.191 |
| WAS-02 | 192.168.62.192 |
2.5 安装一些必备的工具
$ yum install -y unzip tree
3. 安装Installation Manager
3.1 上传Installation Manager安装文件
$ tree
.
├── installation-manager
│   └── agent.installer.linux.gtk.x86_64_1.8.5000.20160506_1125.zip
└── was-nd
    ├── WAS_ND_V8.5.5_1_OF_3.zip
    ├── WAS_ND_V8.5.5_2_OF_3.zip
    └── WAS_ND_V8.5.5_3_OF_3.zip

2 directories, 4 files
3.2 解压Installation Manager的安装文件
$ cd installation-manager
$ unzip agent.installer.linux.gtk.x86_64_1.8.5000.20160506_1125.zip
3.3 安装Installation Manager
#root权限执行如下
$ sudo ./installc -c
#非root权限执行如下
$ ./userinstc -c
Preprocessing the input.
Loading repositories...
Preparing and resolving the selected packages...


=====> IBM Installation Manager> Install

Select packages to install:
     1. [X] IBM® Installation Manager 1.8.5

     O. Check for Other Versions, Fixes, and Extensions

     N. Next,      C. Cancel
-----> [N] N
Validating package prerequisites...


=====> IBM Installation Manager> Install> Licenses

Read the following license agreements carefully.
View a license agreement by entering the number:
     1. IBM Installation Manager - License Agreement

Options:
     A. [ ] I accept the terms in the license agreement
     D. [ ] I do not accept the terms in the license agreement

     B. Back,      C. Cancel
-----> [C] A


=====> IBM Installation Manager> Install> Licenses

Read the following license agreements carefully.
View a license agreement by entering the number:
     1. IBM Installation Manager - License Agreement

Options:
     A. [X] I accept the terms in the license agreement
     D. [ ] I do not accept the terms in the license agreement

     B. Back,      N. Next,      C. Cancel
-----> [N] N


=====> IBM Installation Manager> Install> Licenses> Location

Installation Manager installation location:
        /opt/IBM/InstallationManager/eclipse

Options:
     L. Change Installation Manager Installation Location

     B. Back,      N. Next,      C. Cancel
-----> [N] N


=====> IBM Installation Manager> Install> Licenses> Location> Summary

Target Location:
  Package Group Name         :  IBM Installation Manager
  Installation Directory     :  /opt/IBM/InstallationManager/eclipse

Packages to be installed:
        IBM® Installation Manager 1.8.5

Options:
     G. Generate an Installation Response File

     B. Back,      I. Install,      C. Cancel
-----> [I] I
                 25%                50%                75%                100%
------------------|------------------|------------------|------------------|
............................................................................

=====> IBM Installation Manager> Install> Licenses> Location> Summary>
  Completion

The install completed successfully.

Options:
     R. Restart Installation Manager
-----> [R] R
Preprocessing the input.

=====> IBM Installation Manager

Select:
     1. Install - Install software packages
     2. Update - Find and install updates and fixes to installed software packages
     3. Modify - Change installed software packages
     4. Roll Back - Revert to an earlier version of installed software packages
     5. Uninstall - Remove installed software packages

Other Options:
     L. View Logs
     S. View Installation History
     V. View Installed Packages
        ------------------------
     P. Preferences
        ------------------------
     A. About IBM Installation Manager
        ------------------------
     X. Exit Installation Manager

-----> X
4. 安装Websphere application Server
4.1 解压WAS8.5.5的安装文件
$ cd ~/ibm-install/was-nd/
$ unzip WAS_ND_V8.5.5_1_OF_3.zip
$ unzip WAS_ND_V8.5.5_2_OF_3.zip
$ unzip WAS_ND_V8.5.5_3_OF_3.zip
4.2 启动Installation Manager的Console模式,并安装WAS
$ cd /opt/IBM/InstallationManager/eclipse/tools/
$ ./imcl -c
=====> IBM Installation Manager

Select:
     1. Install - Install software packages
     2. Update - Find and install updates and fixes to installed software packages
     3. Modify - Change installed software packages
     4. Roll Back - Revert to an earlier version of installed software packages
     5. Uninstall - Remove installed software packages

Other Options:
     L. View Logs
     S. View Installation History
     V. View Installed Packages
        ------------------------
     P. Preferences
        ------------------------
     A. About IBM Installation Manager
        ------------------------
     X. Exit Installation Manager

-----> P

=====> IBM Installation Manager> Preferences

Select:
     1. Repositories
     2. Appearance
     3. Files for Rollback
     4. SSL/TLS
     5. HTTP/FTP Proxy
     6. Passport Advantage
     7. Secure Storage
     8. Updates

     R. Return to Main Menu
-----> [1] 1

=====> IBM Installation Manager> Preferences> Repositories

Repositories:

Other Options:
     D. Add Repository

     S. [X] Search service repositories during installation and updates

     R. Restore Defaults
     A. Apply Changes and Return to Preferences Menu
     P. Temporarily Keep Changes and Return to Preferences Menu

-----> D

=====> IBM Installation Manager> Preferences> Repositories> Add repository

Enter a new repository location. To skip, press Enter:
-----> /root/ibm-install/was-nd/repository.config
Checking repositories...

=====> IBM Installation Manager> Preferences> Repositories

Repositories:
     1. [X] /root/ibm-install/was-nd/repository.config

Other Options:
     D. Add Repository

     S. [X] Search service repositories during installation and updates

     R. Restore Defaults
     A. Apply Changes and Return to Preferences Menu
     P. Temporarily Keep Changes and Return to Preferences Menu

-----> A

=====> IBM Installation Manager> Preferences

Select:
     1. Repositories
     2. Appearance
     3. Files for Rollback
     4. SSL/TLS
     5. HTTP/FTP Proxy
     6. Passport Advantage
     7. Secure Storage
     8. Updates

     R. Return to Main Menu
-----> [1] R

=====> IBM Installation Manager

Select:
     1. Install - Install software packages
     2. Update - Find and install updates and fixes to installed software packages
     3. Modify - Change installed software packages
     4. Roll Back - Revert to an earlier version of installed software packages
     5. Uninstall - Remove installed software packages

Other Options:
     L. View Logs
     S. View Installation History
     V. View Installed Packages
        ------------------------
     P. Preferences
        ------------------------
     A. About IBM Installation Manager
        ------------------------
     X. Exit Installation Manager

-----> 1
Checking repositories...
Loading repositories...
Checking availability of packages...
Validating package prerequisites...


=====> IBM Installation Manager> Install

Select packages to install:
     1. [ ] IBM WebSphere Application Server Network Deployment 8.5.5.0


     C. Cancel
-----> [C] 1

=====> IBM Installation Manager> Install> Select

IBM WebSphere Application Server Network Deployment 8.5.5.0

Options:
     1. Show all available versions of the package.

ERROR: The package IBM WebSphere Application Server Network Deployment 8.5.5.0 (8.5.5000.20130514_1044) does not support being installed in console mode.

     C. Cancel
最后报错WAS ND版本不支持在Console Mode下安装。
4.3 安装火狐浏览器
$ yum install -y firefox
$ which firefox
/usr/bin/firefox
4.4 设置umask
$ umask 022
4.5 安装一些需要的yum包
$ yum groupinstall "X Window System" -y
客户端如果用的是Macos系统,则需要安装Xquartz
如果用的是windows,则建议使用xshell+xming搭配
这样就可以在客户端调用服务器的WEB页面出来进行WAS的安装
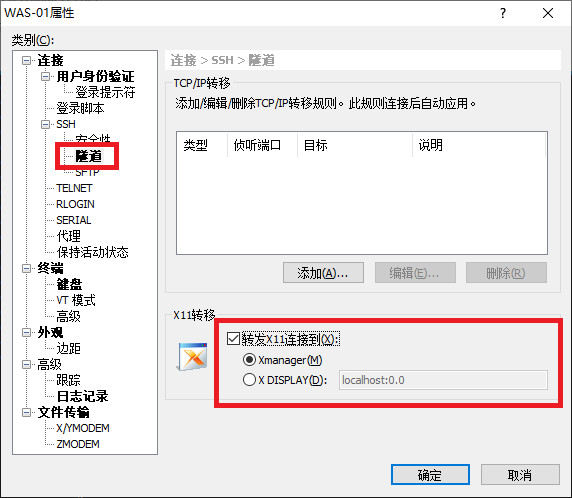
4.6 设置Xshell的X11连接到Xmanager
4.7 重新进入Xshell的会话,并开始安装
$ cd /opt/IBM/InstallationManager/eclipse/
$ ./IBMIM
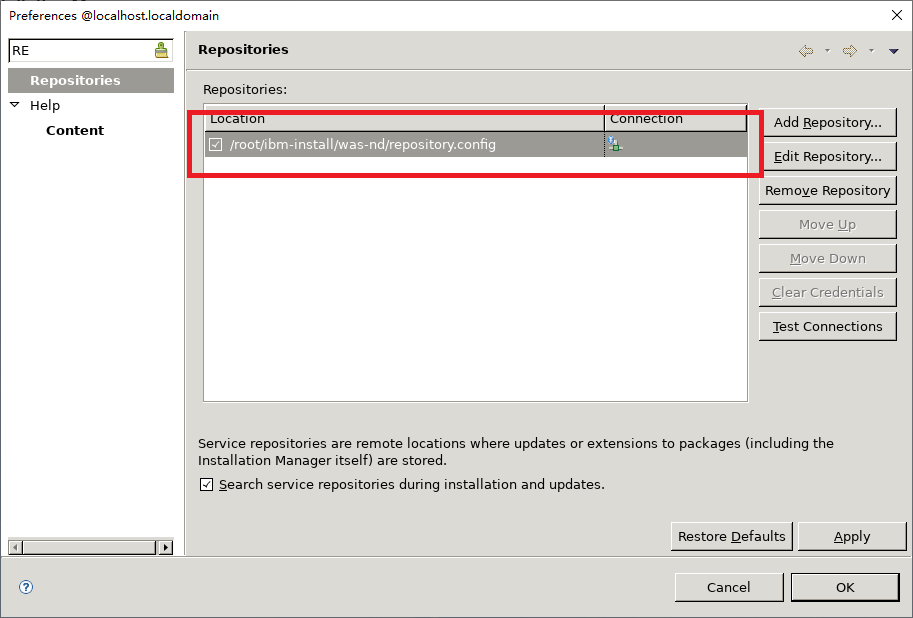
4.8 设置Repositories
点击File -> Preferences -> Repositories -> add Repository, 将新Repository的地址添加为/root/ibm-install/was-nd/repository.config