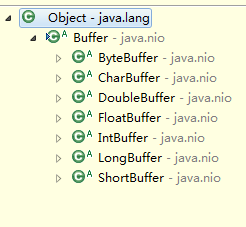
Buffer
上一节中已经讲过,Buffer有如下几种,其中最常用的是ByteBuffer:
Buffer用法示例
ByteBufferTest.txt
Hello World!ByteBufferTest.java
package com.freud.nio;

import java.io.File;
import java.io.RandomAccessFile;
import java.nio.ByteBuffer;
import java.nio.channels.FileChannel;

/**
 * @author Freud
 */
public class ByteBufferTest {

	public static void main(String[] args) throws Exception {
		RandomAccessFile file = new RandomAccessFile(new File(
				"resources/ByteBufferTest.txt"), "rw");
		FileChannel channel = file.getChannel();
		ByteBuffer buffer = ByteBuffer.allocate(10);
		while (channel.read(buffer) != -1) {
            buffer.flip();
            print1(buffer);
            print2(buffer);
            buffer.clear();
            buffer.mark();
        }
		channel.close();
		file.close();
	}

	/**
	 * 打印ByteBuffer中所有的字节
	 */
	private static void print1(ByteBuffer buffer) {
		System.out.print("Print by print1 : ");
		for (byte b : buffer.array()) {
			System.out.print((char) b);
		}
		System.out.println();
	}

	/**
	 * 按照字节逐个打印
	 */
	private static void print2(ByteBuffer buffer) {
		System.out.print("Print by print2 : ");
		while (buffer.hasRemaining()) {
			System.out.print((char) buffer.get());
		}
		System.out.println();
	}
}
输出结果
Print by print1 : Hello Worl
Print by print2 : Hello Worl
Print by print1 : d!llo Worl
Print by print2 : d!
分析
以上源码中使用RandomAccessFile读取了本地磁盘的一个文件,通过FileChannel写入到ByteBuffer中,再从ByteBuffer中打印到输出控制台上。
但很明显的可以看到方法print1的第二次打印明显不是我们预期的结果,在clear之后本能的想法是buffer应该被清空了,但是为什么还会有上次的读取结果,产生这个结果的原因正是ByteBuffer的数据模型造成的。在下面的介绍中我们会详细介绍产生的原因。
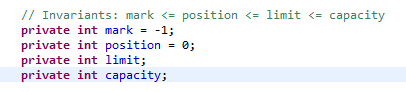
mark position limit capacity
Buffer分为读模式(从Buffer中读取数据)和写模式(写数据到Buffer中),模式的切换是通过flip来实现的,在不同的模式下position和limit的概念是不同的,而capacity和mark是相同的。
释义
| position | 当写模式下时,position当前位置,初始的position值为0.当一个byte、long等数据写到Buffer后, position会向前移动到下一个可插入数据的Buffer单元。position最大可为capacity–1;在读模式下时,也是从某个特定位置读。当将Buffer从写模式切换到读模式,position会被重置为0. 当从Buffer的position处读取数据时,position向前移动到下一个可读的位置。 |
| limit | 在写模式下,Buffer的limit表示你最多能往Buffer里写多少数据。 写模式下,limit等于Buffer的capacity。 |
| capacity | 作为一个内存块,Buffer有一个固定的大小值,也叫“capacity”.你只能往里写capacity个byte、long,char等类型。一旦Buffer满了,需要将其清空(通过读数据或者清除数据)才能继续写数据往里写数据。 |
| mark | 标记,可以通过mark()方法记录当前position值,然后通过reset()方法可以使position重新回到mark的位置,而clear()、rewind()、flip()方法总是会重置mark为初始状态-1 |
初始值
Buffer
Buffer的API中大量使用链式编程设计,使得API调用非常顺畅而自然。
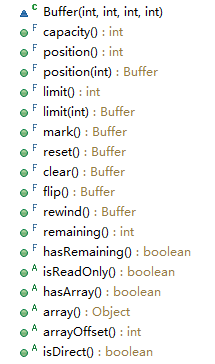
position(int)
需要注意的是当设置当前position的时候,如果之前设置了mark,那么如果mark值大于position,则会重置mark为初始状态。
// 源码
public final Buffer position(int newPosition) {
    if ((newPosition > limit) || (newPosition < 0))
        throw new IllegalArgumentException();
    position = newPosition;
    if (mark > position) mark = -1;
    return this;
}
limit(int)
设置limit跟设置position是类似的,不只设置了limit的值,如果当前position大于要设置的limit,则将position赋值为最新的limit,如果mark大于要设置的limit,则重置mark为初始状态。
// 源码
public final Buffer limit(int newLimit) {
    if ((newLimit > capacity) || (newLimit < 0))
        throw new IllegalArgumentException();
    limit = newLimit;
    if (position > limit) position = limit;
    if (mark > limit) mark = -1;
    return this;
}
mark()
mark是标记mark值为当前的position值。
// 源码
public final Buffer mark() {
    mark = position;
    return this;
}
reset()
如果标记了mark,重置position回到当初标记的mark位置。没有标记过mark,则抛出异常。
// 源码
public final Buffer reset() {
    int m = mark;
    if (m < 0)
        throw new InvalidMarkException();
    position = m;
    return this;
}
clear()
clear其实是设置position,limit,mark的值回到初始值状态。这也就解释了为什么刚开始的Demo中print1第二次打印出的并非我们预期的结果,原因是clear只是重置了这些游标数值。并没有真正的清空buffer中的内容。当从读模式切换到写模式的时候需要调用clear()方法。
// 源码
public final Buffer clear() {
    position = 0;
    limit = capacity;
    mark = -1;
    return this;
}
flip()
设置limit为position的值,即当前读取到的byte,long等总和-1位置。重置position和mark回到初始值。当从写模式变为读模式的时候需要调用flip()方法.
// 源码
public final Buffer flip() {
    limit = position;
    position = 0;
    mark = -1;
    return this;
}
rewind()
rewind跟flip有些类似,只是并没有修改limit的值。
// 源码
public final Buffer rewind() {
    position = 0;
    mark = -1;
    return this;
}
hasRemaining()
通过判断limit-position的值来判断Buffer中是否还有未读取的元素。
// 源码
public final boolean hasRemaining() {
    return position < limit;
}
remaining()
与hasRemaining相似,只是返回了未读取的元素个数,更详细。
// 源码
public final int remaining() {
    return limit - position;
}
ByteBuffer
Buffer分配
要想获得一个Buffer对象首先要进行分配。 每一个Buffer的实现类都有一个allocate方法。而ByteBuffer实际底层源代码是创建了一个HeapByteBuffer对象。也可以通过allocateDirect方法创建一个DirectByteBuffer对象。HeapByteBuffer和DirectByteBuffer的不同之处在与,HeapByteBuffer分配的内存在JVM Heap上,而DirectByteBuffer分配的内存在C的Heap上。
Buffer buffer = ByteBuffer.allocate(10);// 源码
public static ByteBuffer allocateDirect(int capacity) {
return new DirectByteBuffer(capacity);
}
public static ByteBuffer allocate(int capacity) {
if (capacity < 0)
throw new IllegalArgumentException();
return new HeapByteBuffer(capacity, capacity);
}compareTo
ByteBuffer实现了Comparable接口,所以两个ByteBuffer对象是可以比较的。而比较的逻辑是比较从position到limit之间的元素是否相同。源码如下:
// 源码
public int compareTo(ByteBuffer that) {
    int n = this.position() + Math.min(this.remaining(), that.remaining());
    for (int i = this.position(), j = that.position(); i < n; i++, j++) {
        int cmp = compare(this.get(i), that.get(j));
        if (cmp != 0)
            return cmp;
    }
    return this.remaining() - that.remaining();
}

private static int compare(byte x, byte y) {
    return Byte.compare(x, y);
}
HeapByteBuffer
接下来拿HeapByteBuffer来看下怎样向Buffer中写入和读取数据的。
分配空间
HeapByteBuffer在初始化的时候创建了一个长度为cap的byte数组。而所有的元素都是存储在这个数组中,所有的操作都是针对这个数组的操作。
// 源码
HeapByteBuffer(int cap, int lim) {// package-private
	// ByteBuffer(int mark, int pos, int lim, int cap, byte[] hb, int offset)
    super(-1, 0, lim, cap, new byte[cap], 0);
}
写入
当写入数据的时候其实是向position位置的byte数组中写入了一个字节,然后position的位置加一直到limit为止。ByteBuffer有很多的重载put方法,但是原理都大同小异。
// 源码
public ByteBuffer put(byte x) {
    hb[ix(nextPutIndex())] = x;
    return this;
}

protected int ix(int i) {
	return i + offset;
}

final int nextPutIndex() {// package-private
    if (position >= limit)
        throw new BufferOverflowException();
    return position++;
}
读取
读取与写入类似,在当前position位置读取一个字节,然后position加一直到limit为止。
// 源码
public byte get() {
    return hb[ix(nextGetIndex())];
}
protected int ix(int i) {
	return i + offset;
}
final int nextGetIndex() { // package-private
	if (position >= limit)
    	throw new BufferUnderflowException();
	return position++;
}
浅复制
浅复制只会复制position到limit之间的元素,并且不会保留mark,position,limit,capacity,offset的状态。
// 源码
public ByteBuffer slice() {
    return new HeapByteBuffer(hb, -1, 0, this.remaining(), this.remaining(), this.position() + offset);
}
深复制
深复制会复制整个对象所维持的状态,包括其中mark,position,limit,capacity,offset的状态。
// 源码
public ByteBuffer duplicate() {
    return new HeapByteBuffer(hb, this.markValue(), this.position(), this.limit(), this.capacity(), offset);
}
参考资料
JAVA-NIO(英文版) - Ron Hitchens
JAVA-NIO(中文版) - Ron Hitchens(著) 裴小星(译)
Java nio tutorial : http://tutorials.jenkov.com/java-nio/index.html
并发编程网:Java NIO系列教程-中文翻译版 : http://ifeve.com/overview/